Write to an HFS+ (Mac formatted) USB drive from a Synology NAS
So, I’ve had my Synology DS214se for a few months now, and it’s done a sterling job of hosting my wireless Time Machine backups as well as my movies and TV shows.
This afternoon, I’ll be setting off on a short trip to see my parents. It would be nice to take my video files with me, on an external USB drive, so I can chill out in front of them on the train.
I’ve previously covered mounting the internal shares from a Synology NAS on your Mac’s desktop. And the simplest way to copy the files I want would be to plug my USB drive into my Mac, mount up the NAS’s shared folder, and drag the files and folders across.
Problem is, for large folders, this takes forever – partly because of the dog-slow wireless transfer speed, and partly because my poor Mac is having to act as an intermediary between the two drives. It also means my Mac has to stay on and connected to both the USB drive and the WiFi network for the entirety of the transfer. Not ideal.
Copying files directly, over SSH
The proper way to do this is to mount the USB drive directly onto the Synology NAS, and copy the files from there, over SSH. For example, after SSHing to the diskstation:
cp /volume1/files/some-large-folder /volumeUSB1/usbshare1-2/
Problem is, if you try that, and your USB drive is HFS+ formatted, you’ll get this error:
cp: can't create directory '/volumeUSB1/usbshare1-2/some-large-folder': Read-only file system
Mounting the HFS+ as a read-write filesystem
You might think HFS+ (also sometimes called “Mac OS Extended”) isn’t compatible with Linux, and that’s the issue. But that’s not true: Linux has had support for reading and writing HFS+ volumes for years. Well, “support” with the following two caveats:
- The HFS+ drive must be smaller than 2TB.
- The HFS+ drive must have Journaling disabled.
Journaling is a technology for avoiding corruption on HFS+ drives in the case of power loss or a system crash. Basically, on a journaled file system, before any changes to files are made, the drive also makes a note of the changes, like a receipt. That way, if the drive suddenly loses power during the change, or something, it can look at the journal next time it starts, and work out what it was doing and how it should clean everything up.
Linux, however, doesn’t support journaling on HFS+ drives (at least, not without third-party drivers). So, your DiskStation mounts journaled drives read-only, which is why the file copy is failing.
You can tell whether a drive is mounted read-only or read-write, in Linux, by running the mount command. Here’s what you might see:
/dev/root on / type ext4 (rw,relatime,user_xattr,nosynoacl,barrier=1,journal_checksum,data=ordered)
none on /dev/pts type devpts (gid=4,mode=620)
/sys on /sys type sysfs (0)
/tmp on /tmp type tmpfs (0)
/proc/bus/usb on /proc/bus/usb type usbfs (0)
/dev/vg1000/lv on /volume1 type ext4 (usrjquota=aquota.user,grpjquota=aquota.group,jqfmt=vfsv0,synoacl)
/volume1/@optware on /opt type bind (bind)
/dev/sdq1 on /volumeUSB1/usbshare1-1 type vfat (utf8,umask=000,shortname=mixed,uid=1024,gid=100)
/dev/sdq2 on /volumeUSB1/usbshare1-2 type hfsplus (ro,force,uid=1024,gid=100,umask=000)
The last line shows volumeUSB1/usbshare1-2 is an hfsplus formatted drive and has been mounted ro or read-only.
Disabling journaling on an HFS+ drive
Annoyingly, there’s no way to disable journaling from the DiskStation itself. You need to plug the USB drive back into your Mac, open up Disk Utility, and do it from there.
Select the drive you’re interested in, then hold down the Alt or Option key and choose File > Disable Journaling from the main menu.
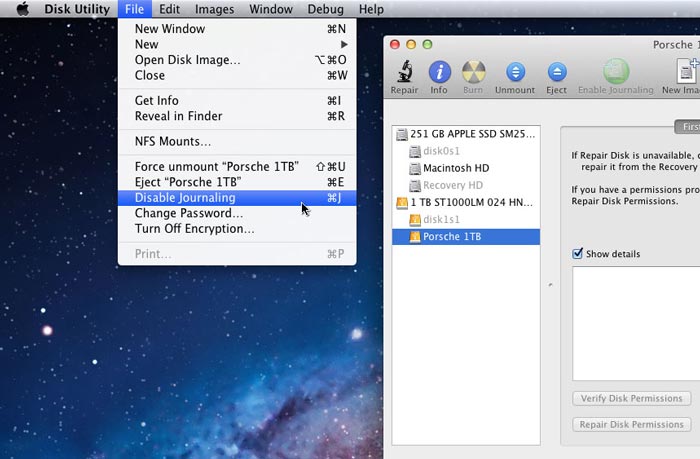
You can then press the Eject button in the Disk Utility toolbar, unplug the drive from your Mac, and plug it back into your DiskStation.
Depending on what your plans are for the drive, you might want to re-enable journaling once you’re done with the copying – after all, with journaling disabled, your drive is more vulnerable to data corruption than normal.
Mounting the drive read-write: Part II
With journaling disabled, you’re all set to go. Except – you aren’t. Despite the HFS+ drive now being perfectly compatible with the Linux drivers, your DiskStation still mounts it read-only. For example after running mount on the diskstation, you’ll see:
/dev/root on / type ext4 (rw,relatime,user_xattr,nosynoacl,barrier=1,…
...
/dev/sdq1 on /volumeUSB1/usbshare1-1 type vfat (utf8,umask=000,shortn…
/dev/sdq2 on /volumeUSB1/usbshare1-2 type hfsplus (ro,force,uid=1024,…
I’ve no idea why Synology does this, but you can solve it by just mounting the drive yourself, using the mount command we’ve come to know so well.
First, unmount the existing drive (using the output of mount to see what the /dev/… ID is for the drive):
umount -f /dev/sdq2
Then mount it again, specifying the same default directory, and the hfsplus format:
mount -t hfsplus /dev/sdq2 /volumeUSB1/usbshare1-2
You can check it’s been mounted correctly by running mount again with no arguments:
/dev/root on / type ext4 (rw,relatime,user_xattr,nosynoacl,barrier=1,…
...
/dev/sdq1 on /volumeUSB1/usbshare1-1 type vfat (utf8,umask=000,shortn…
/dev/sdq2 on /volumeUSB1/usbshare1-2 type hfsplus (0)
There’s no more read-only ro flag, meaning we can read-write to our hearts’ content.
cat 'Hello HFS+ filesystem!' > /volumeUSB1/usbshare1-2/hello.txt
cat /volumeUSB1/usbshare1-2/hello.txt
Hello HFS+ filesystem!
From there, it’s down to you to work out how to copy files. If you’re copying a lot of data, I would suggest opening a screen session1, so you can log out of the SSH connection without interrupting the transfer.
Once you’re done, you can unmount the drive from the command line (using umount as above) or from the menu bar in the Synology DSM web interface. And, as I said before, you might also want to re-enable journaling the next time you plug the USB drive back into your Mac.
End-to-end, the whole thing looks a bit like this:
$ ssh diskstation
diskstation> screen
~ # mount
/dev/root on / type ext4 (rw,relatime,user_xattr,nosynoacl…
none on /dev/pts type devpts (gid=4,mode=620)
/sys on /sys type sysfs (0)
/tmp on /tmp type tmpfs (0)
/proc/bus/usb on /proc/bus/usb type usbfs (0)
/dev/vg1000/lv on /volume1 type ext4 (usrjquota=aquota.user…
/volume1/@optware on /opt type bind (bind)
/dev/sdq1 on /volumeUSB1/usbshare1-1 type vfat (utf8,umask=…
/dev/sdq2 on /volumeUSB1/usbshare1-2 type hfsplus (ro,force…
~ # umount /dev/sdq2
~ # mount -t hfsplus /dev/sdq2 /volumeUSB1/usbshare1-2
~ # cp -r /volume1/files/some-large-folder /volumeUSB1/usbshare1-2/
~ # umount /dev/sdq2
~ # exit
-
screendoesn’t come as standard on Synology DiskStations, but I‘ve covered installing it with ipkg here. To start a screen session, typescreen. To detach from a session (without affecting any long-running processes inside it), pressctrl-aand thend. To reattach to a session, typescreen -x. And to close a session for good (ending any long running processes inside it), pressctrl-dor just typeexit. ↩