Running modded Cities Skylines 1 on Linux in 2023
Note: I started this blog post a few weeks before Cities Skylines 2 was announced (how’s that for timing?) but I expect people will be playing CS1 for at least a few years, while the DLC and modding scene for CS2 develops. So, hopefully, this post is still useful!

Cities Skylines is a popular city-builder simulation game. And amazingly it works on Linux out of the box! Woo!
But anyone who’s played Cities Skylines for more than 15 minutes knows that the Skylines experience is all about the mods – unofficial, third-party additions to the game, that are provided for free by other players. Mods can remove in-game limitations, and add new features and capabilities, that completely transform how you play.
The game rental/distribution platform Steam has leaned heavily into the game modding scene, enabling players to share their mods for free on any game’s “workshop” page in the store. But because mods are unofficial, and usually developed as labours of love by volunteer (usually Windows-based) Skylines players—and because they modify core game features in a totally unsupported way—there is no guarantee that they’ll work under Linux.
To make matters worse, each update to the underlying game can potentially break any mod. Many of Cities Skylines’ old stalwart mods—long abandoned by their maintainers, but still just about hanging on—finally broke with the updates to the base game that accompanied the Airports and Financial Districts DLCs in 2022 (patches 1.14.0–1.16.0).
But life finds a way! During 2022, a new generation of modders arose from the community, resulting in new versions of classic mods like 81 Tiles 2, Node Controller Renewal, and Network Anarchy 3. And encouragingly, this time round, it seems like the community is doing a much better job of pushing for standardisation and compatibility between mods, with meta-mods like Compatibility Report (now “Skyve”) and Loading Screen Mod Revisited making mods easier to manage and load together.
I recently upgraded my gaming PC to Pop!_OS 22.04 LTS, and decided to start afresh with my Skylines mods. I figured I’d share the setup steps here, in case others find them useful. A few notes, though, before I begin:
- These instructions are for Pop!_OS 22.04 LTS, but will likely apply to other versions of Pop!_OS, and indeed similar versions of Ubuntu (which Pop!_OS is based on) and any other Ubuntu-like operating systems.
- These instructions are for the current—and probably final—version of Cities Skylines 1 (patch 1.17.0). If CS1 gets more updates, these instructions should still apply, but they are unlikely to apply to the newly announced Cities Skylines 2.
- I assume you’re running Cities Skylines via Steam. The steps below might work for other methods of installing the game, but at a minimum you’ll need to modify any references to the
.steam/directory paths. - And finally, these instructions assume you are comfortable with the technical side of a Linux environment. This is more than just pasting some commands into Terminal. If commands like
cd,sudo, andaptdon’t mean anything to you, then you’re going to face trouble as soon as anything below doesn’t work as expected.
A word about my Pop!_OS setup
Coming from a software development background, I tend to want a reproducible build for my devices, wherever possible. I follow something akin to the Scripts To Rule Them All philosophy on my devices, with a file at script/bootstrap that installs any custom software required on the computer, and another file at script/update that updates the installed software. As an example, here’s how my script/update looks:
#!/bin/sh

sudo apt-get update
sudo apt-get --with-new-pkgs upgrade --allow-downgrades -y
sudo apt autoremove
flatpak update -y
I’m going to mention adding lines to script/bootstrap in the instructions below – but if you’d rather just run the commands one-off, you’re welcome to.
Bypassing the Paradox launcher
A few years ago, some product manager at Paradox decided they needed to justify a promotion, and so shoehorned a stupid launcher screen into Cities Skylines, to act as a delivery mechanism for adverts and other crap.
Some mods—like FPS Booster, see below—include a bypass for the Paradox Launcher already.
But if you don’t want to run one of those mods, you can bypass the Launcher by opening the “Properties” (settings) for Cities Skylines in Steam, and setting the Launch Options to:
/home/YOUR_USERNAME_HERE/.steam/steam/steamapps/common/Cities_Skylines/Cities.x64 %command%
Installing Mono
Mono is an open source implementation of Microsoft’s .NET framework, and a number of very popular Cities Skylines mods make use of it – including Traffic Manager President Edition and Compatibility Report / Skyve.
Mono doesn’t come pre-installed on Linux machines, but it’s easy to install yourself.
As mentioned above, I like to store setup commands in a script that I can run again if I need to. So, to install Mono, I added the following snippet from Mono’s Ubuntu installation instructions to my script/bootstrap file:
# https://www.mono-project.com/download/stable/#download-lin-ubuntu
# Mono required by some Cities Skylines mods.
sudo apt install ca-certificates gnupg
sudo gpg --homedir /tmp --no-default-keyring --keyring /usr/share/keyrings/mono-official-archive-keyring.gpg --keyserver hkp://keyserver.ubuntu.com:80 --recv-keys 3FA7E0328081BFF6A14DA29AA6A19B38D3D831EF
echo "deb [signed-by=/usr/share/keyrings/mono-official-archive-keyring.gpg] https://download.mono-project.com/repo/ubuntu stable-focal main" | sudo tee /etc/apt/sources.list.d/mono-official-stable.list
sudo apt update
sudo apt install mono-devel
With that added, running script/bootstrap installs Mono. Woop!
Finding and installing mods
Now that we’ve got Mono installed, we can be a bit more confident that any mods we install will actually run. I started with this list of popular mods from the Cities Skylines reddit wiki – picking the dozen or so that I felt suit my play style.
Remember, subscribing to the mods in Steam just downloads them. You also need to activate them in the “Content Manager” screen inside of Cities Skylines, before they’ll take effect. I usually activate them a few at a time, restarting the game between each batch, so that I can narrow down any trouble-makers.
With Mono installed, most mods will just work out of the box. But a few require special attention…
Running FPS Booster
FPS Booster is a fairly popular mod that alters some of the Unity Engine underpinnings of Cities Skylines, to avoid unnecessary work, speeding up the rendering of your game. The mod maker provides instructions for running the mod under Linux, but they’re somewhat overcomplicated. If you’ve installed Cities Skylines via Steam, you only need to change one thing, and it’s our old friend the Launch Options again!
Open up the “Properties” (settings) for Cities Skylines in Steam, and change your Launch Options to:
/home/YOUR_USERNAME_HERE/.steam/steam/steamapps/common/Cities_Skylines/Cities_Loader.sh %command%
The eagle-eyed will notice that all we’ve done from the Paradox Launcher bypass snippet above is replace Cities.x64 with Cities_Loader.sh, which is FPS Booster’s wrapper around the Cities Skylines executable, allowing it to modify the Mono environment, before it then goes on to call Cities.x64 for us. Simple!
Running CSL Map View
CSL Map View is a lovely mod that lets you export a map-like diagram of your city, from a bird’s eye view:
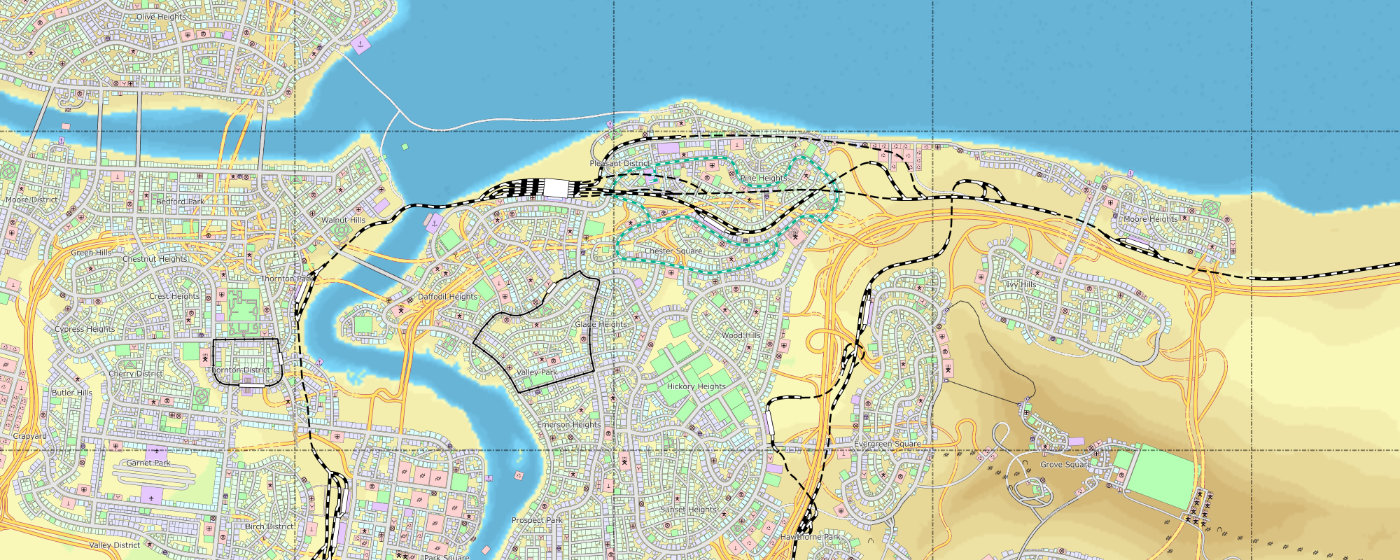
It’s a two-part mod – there’s the screen inside Cities Skylines, where you can press a button to generate an XML dump (with a .cslmap file extension) of your city, and then there’s a separate CSLMapView.exe Windows executable program that you need to use to convert the .cslmap file into an image.
The Steam page for the CSL Map View mod says it only supports Windows – but we can run CSLMapView.exe on Linux through a Windows emulator like Wine.
You could run Wine via a convenience wrapper like Bottles, but I chose to use Wine directly. I added the following to my script/bootstrap script, to install Wine, and then ran it:
# https://wiki.winehq.org/Ubuntu
sudo mkdir -pm755 /etc/apt/keyrings
sudo wget -O /etc/apt/keyrings/winehq-archive.key https://dl.winehq.org/wine-builds/winehq.key
sudo wget -NP /etc/apt/sources.list.d/ https://dl.winehq.org/wine-builds/ubuntu/dists/jammy/winehq-jammy.sources
sudo apt update
sudo apt install -y --install-recommends winehq-stable
I’m using the Wine apt sources for Ubuntu 22.04 (“jammy”) here, but if you’re visiting this post from the future, you might be on a more recent version. Check what version your system is running, and find the appropriate code snippet from the Wine Ubuntu installation page.
When you install and enable the CSL Map View mod inside Cities Skylines, a Windows executable is placed at:
~/.steam/debian-installation/steamapps/common/Cities_Skylines/CSLMapView/CSLMapView.exe
You can ask Wine to create a wrapper for CSLMapView.exe by right-clicking it and selecting “Open with Wine Windows Program Loader”. (The first time you do this, Wine will also prompt you to let it install some Mono bindings – tell it to go ahead and install.)
After a few moments, the CSLMapView Windows program will open up, looking like something out of 1998. Now all you need is a .cslmap XML file to feed into it, to generate an image!
Open up a city in Cities Skylines, go to the CSL Map View mod options from within the city, and press the “Export” button. CSL Map View will export an XML dump of your city as a .cslmap file in the directory:
~/.steam/debian-installation/steamapps/common/Cities_Skylines/CSLMapView
It’s a bit tricky navigating to this directory from within the File → Open dialog inside the Windows CSLMapView.exe program, because the Windows file browser has no way to show the hidden .steam directory. So I create a shortcut to the directory, first. For convenience, I tend create shortcuts to various Steam folders in my home directory, like so:
mkdir -p ~/shortcuts
ln -s ~/.steam/debian-installation/steamapps/common/Cities_Skylines/CSLMapView ~/shortcuts/CSLMapView
With the shortcut in place, my .cslmap files are easy to access from within the File → Open dialog. In my case I drill down to / → home → zarino → shortcuts → CSLMapView. Once you’ve got the map loaded up, it should be pretty obvious how to use the program to set the output options and export to an image file.